Tuesday, 27 September 2011

Mooooo

Hey guys,

I have neglected this recently, but I am back on form! I did a fantastic moo cow cake for Jade's 21st Birthday,

I loved doing this! and had no trouble with it, which just goes to show if you stick to something for long enough you get the results. 

I made this using a giant pyrex dish, and a smaller one for the head, the splodges were cut free hand, it was a pleasure to make :-)

I have two important cakes coming up this weekend, and I can't wait to upload the pictures!

kat
xx 

Tuesday, 19 July 2011

From 1 to 21!

Hey Everyone,

I've had a busy few weeks, my gorgeous nephew Cody celebrated his 1st Birthday! and I was delighted to make his cake,

I decided on a chocolate 1, got out my spray gun and gave it a green colour, I modelled the sheep and little stones, simple but I think lovely and effective!

I was also asked to make a little cake for one of my best friends! Her mother asked for a vanilla and jam, pink and white 2 and a 1,
Loved creating this! very bright and fun cake, to match her personality :-)! YUM
Next weekend is my lovely boyfriends Birthday, I'm wondering what to create!

xx

Friday, 3 June 2011

Fondant Figure Tutorial

Hey Guys,

I've decided I shall show you step by step on how to make a fondant Figure,
I am using my example from the Army style cake I made Yesterday :-)

You will need, fondant, various cake decorating tools, a cocktail stick, a paint brush and edible glue (or water)
Break off a chunk of fondant (whichever colour you desire) these will be the legs,
Roll the fondant into a sausage shape

Bend the fondant around so both sides are of equal length, (you can always use a knife to trim to size) These are your legs
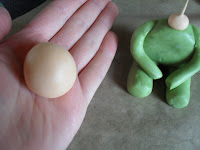
Take another lump of fondant, slightly bigger and roll it into a tear shape
Place the tear shape on top of the legs, this will be the body of your figure.

Put a cocktail stick all the way through the middle until it reaches the base of your figure.
Take another lump of fondant, rolling it into a sausage shape once again, (this time slightly thinner) and cut them in half, then cut diagonally at one end on both pieces.
Glue, I use a water pen, they have the edible glue inside, which is also re-fillable

Attach the arm, these should stick more or less instantly.
Now for the peach colour, which will act as skin, I use pink and orange to create this colour (more orange than pink). Roll a small ball, this will be his neck.
Glue and attach, pressing the ball into place to make it flat.

Make a larger ball (make sure its in proportion to his body) glue the neck and stick the head on the stick, you may need to trim the stick depending on how big the head is (The stick sometimes will poke through the fondant, if this happens, take the head off and trim the stick, and re mould your head)

Make holes at the end of each limb

nip off some small pieces of fondant, and make little hands (I stick to the mitten look, just basic and looks realistic enough for this kind of character) make sure you make the side you are attaching to the figure slightly pointy, to stick into the hole.

Do the same in black for his boots. (Don't forget to use glue!)


Use your tools to make the holes for eyes, nose and mouth. Glue the eye and nose holes.
Add a little blob of skin coloured fondant for the nose, and two blobs of black fondant for the eyes.
Hair can be created a number of ways, you can use imprints off one of your tools and dusting powders, or you can use a cutter to create the effect of hair, I did both on my cake for these figures.  


And here is the finnished result!


Wednesday, 25 May 2011

Back with a vengeance

Hey guys!

I have neglected my little business, due to concentrating on university work, thankfully that is all out of the way now, meaning I can concentrate on CAKE!

Before I took my little mini break, I was asked to create a number 1 for a little lad's birthday.
I really enjoyed doing this, more so as the little boy also shared the same name is my lovely nephew Cody! I got so many lovely compliments from this cake, which really made the job worthwhile and rewarding!
I've also started to mould a minature keyring of the larger cake, so the cake can 'live on'! Some keyrings I make can be found on Rawtenstall Market Giftware stall too :-)

Over my little break, I also celebrated my 21st Birthday! I decided to make a Super mario cake, half chocolate, half rainbow, it was delish!

I got my spray gun out for this! and had fun making it! the top was a little wrong. I hand made the gingerbread castle to sit on top, (ended up a bit big!) but it looked a bit odd when I stuck it on the cake, alas, it still got ate!

I've got a brill cake coming up next week! can't say too much as it's a surprise but I will say its going to be a difficult but hopefully an amazing cake!

ta taa for now
 Kat
xx

Wednesday, 13 April 2011

Beatles Mania

Hey there!

Last week I had a lovely time making and decorating a Beatles inspired guitar cake :-) it was really fun to do, and I didn't excounter any problems. This is a thing I have noticed throughout my cake making, is that practise really does make perfect, the more you do a cake, the better and wiser you are at doing them, I guess that is common sense though!

Anyhow, I decided for a black and white theme, after many google searches for guitars,
I was really pleased with the outcome! and I hope the owner loved it too


I have also finalised my packaging for my keyrings, and they will be going on sale on saturday at Rawtenstall Market Giftware Stall.

I have also got my own birthday coming up soon, the big 2 1, which will be at the end of the month, but as I am going away I will be celebrating next weekend with my fam and my lovely boyfriend, and yes I shall be making my own cake but you will just have to wait and see for that one!

laters

kat
xx

Tuesday, 5 April 2011

Exciting News!!

Hey Everyone :-)

I have been experimenting with some new and fancy ideas to promote my business :-) I am lucky enough to have a sister who owns a market stall on Rawtenstall Market, so I have decided to handmake some keyring cupcakes with my business name/logo etc on it :-)
I will be selling these at £1 each, they are so cute and quirky! and come in a variety of colours :) I hope to have finalised my packaging ideas by the end of the week and get them into print ready to be sold the following Thursday!

In other news, I have applied for a market stall, I am really excited about this and can't wait until I am selling my cupcakes to the lovely people in Rawtenstall :) I have some really cool things on order too that are gonna be the icing on the cake (sorry for the bad pun) for my business!

ta ta for now xx


Sunday, 3 April 2011

Mothers Day Madness

Hey Lovely People :-)

I have had such a brilliant two days making some delicious treats for not only my mother and the in law, but a special cake order off a friend,

I was asked to create something that summed up a mothers love, and the aspect of Mother's day all in one :-) so I thought why not create a lovely chocolate box cake with hand made chocolates!

I loved doing this cake, everything went to plan and i was very impressed with the finnished result! and the owner of the cake's own quote was 'it looks too good to cut!' haha brilliant!!

I also made two boxes of cupcakes for mine and the boyfriends lovely mother :-)

These went down very well :-) I love using glitter too, makes the cupcakes extra special! and girly haha :-D


On another note, I passed my level 2 in Safety in Catering last week :-) I am thrilled about this, and also thinking about moving my business forward by renting a stall on a local market, I am soo excited I really can't wait!

Got another cake coming up on Friday! will post a few pictures when it's complete

later guys
x